

Creating Consistent Documents Using Microsoft Word Templates (5 Tips)
Seeing your business grow is one of the greatest feelings for any entrepreneur. But with growth comes many changes and obstacles. One of those being maintaining consistency in documents sent out by your partners or employees. Microsoft Word templates are a great way to make sure everyone sends consistently formatted documents that present your brand professionally. Here are my 5 tips for creating Microsoft Word templates.
1. Styles
The Styles tab is the most important tool on Words “Home” main tab. A style is a combination of attributes that define the purpose and formatting of text on a document. Generally everyone uses the Styles tab to assign headings and hierarchy to a document. When creating templates, Styles are used to predefine formatting (like fonts, font sizes, spacing etc.) for all text groups in your document.

To format styles all you have to do is right click one of the styles (e.g. Heading 1, Normal) and select “Modify” off the dropdown that appears. A “Modify Styles” menu will appear with all Words text formatting options. On the bottom left side of the menu is a “Format” button with more great formatting options.
When creating your Word templates you should format all the styles that you will need and then delete the other default styles by right clicking on them and then selecting “Remove from Style Gallery” from the dropdown.
2. Restriction
Now that you have formatted all the styles in your document, all you need to do is restrict other formatting features so whomever uses the template is forced to use one of the styles you’ve modified.
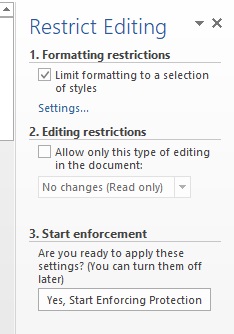
To do this right click on any blank space on the ribbon and select “Customize the Ribbon” off the dropdown that appears. A “Word Options” menu will appear. On the right side of that menu is a list of all the main tabs that can appear on your ribbon. On that list, tick the “Developer” box and then select “OK” on the bottom right. The Developer main tab should now appear on your ribbon. Go to the Developer main tab and select “Restrict Editing”. A sidebar with restriction options should appear. All that left to do is tick the “Limit formatting to a selection of styles” box and then “Yes, Start Enforcing Protection”. If necessary you can assign a password for your restriction. Notice now when you go to your Home main tab your formatting options are grey and not accessible.
3. Spacing
Spacing is
a key component when formatting documents. Generally you can maintain spacing
by clicking enter to skip a line. This method can be bad for companies trying
to maintain consistency because people have different line skipping patterns.
Where one person skips one line another might skip three. A solution to this is
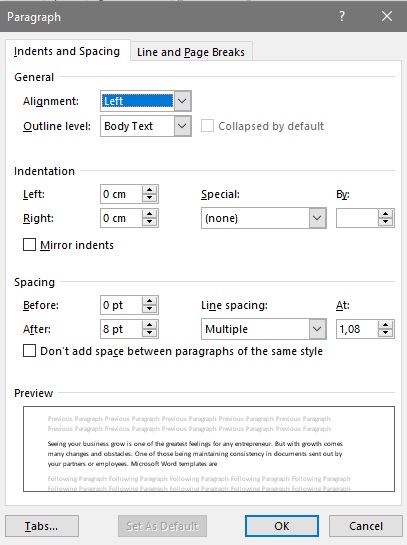
adding spacing before and after headings instead of skipping lines. To do this you’ll
first have to stop your restriction. Now navigate to the “Modify Styles” menu
as we did in the first tip. Click the "Format" button and then
select “Paragraph” off the dropdown that appears. On the menu that appears you should
see options to add spacing before and after headings and also line spacing
settings which can be used for body text.
4. Copy and Paste Settings
For companies that transfer information from document to document it may be hard to maintain consistency when copying and pasting. Word has three paste options. Keep Source Formatting, Merge Formatting and Keep Text Only. When creating templates, you only need the Keep Text Only option. The other two need to be locked. To do this click on “File” and then select “Options” which is right at the bottom of the blue strip on the left. A “Word Options” menu will appear. On the left side of the menu, click “Advanced”, then scroll down to the “Cut, copy, and paste” section and set the options as follows:
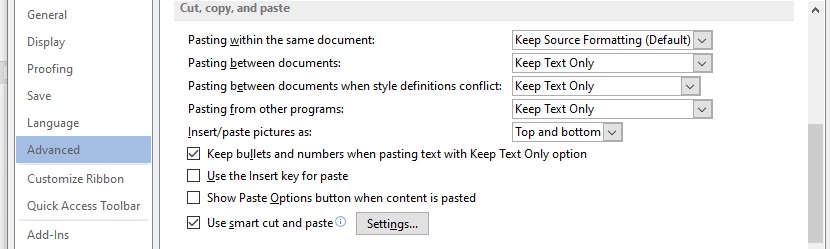
Now all text pasted into the document will take up an existing style.
5. Saving
All that’s left is to save your document. This is no different to how you usually save. Just make sure you change the file type to a “Word Template” document. The difference between a Word template and a Word document is every time you open your template a new document with all the built-in formatting you’ve done will appear. So you won’t be editing the template but a new replica of it. To access the template. Go to “File”, “New” and click on “Personal” which is right above the blank document template. All your custom templates should appear there.
That concludes my tips for creating consistent documents using Microsoft Word templates. If you are looking for someone to help with your businesses document formatting click here.
Thank you for reading!